A Tour of Our Home: Upstairs Guest Room Update (Before & After)

farmhouse bedroom update makeover


Kevin and I have officially been living in our house for a year-and-a-half, and up until recently two of our four bedrooms had remained untouched and un-updated.  Because let's be honest, not all of us have the resources to tackle multiple room makeovers at one time.  Lucky for us these rooms weren't really being used so there was no rush to update them and fill them with furniture.  That is, until I had friends come to visit!  I used my two girlfriends coming into town as an excuse to get down to business and give one of these rooms a facelift.  It's a good thing too since I couldn't stare at that stenciled border for a whole lot longer.

Here's what we started with:


Let's take a closer look at that lovely painted border, shall we?  It's like the room is wrapped in a big Christmas ribbon.

Fancy.


Sorry for the bad lighting, but you get the idea.


As you can see this room was nothing to gawk at.  Boring walls, orange oak trim, and wood outlet covers.  It was basically empty with the exception of an old painted dresser and ladder shelf.  Definitely time to switch things up!  First things first: painting the walls.  Since I didn't have a large spending budget for this room I decided to use up some leftover Behr paint from our main level living area makeover.  It took three coats of primer to get that border covered up....


I also painted the trim which wasn't in the best shape.


Ready for the reveal?  Here's the finished result:

farmhouse bedroom update makeover


The new look is so calm and serene - perfect for a guest room.  And the whole makeover didn't cost much to achieve.  I found the metal bedframe on Craigslist for $85 which I spraypainted with Rustoleum's Oil Rubbed Bronze and the pleated bedspread was on sale at Target.  The prints I had laying around from IKEA and the throw pillows were found at TJ Maxx.  The metal wall hanging was the only real splurge, and even that was only $80 at Kirkland's.

farmhouse bedroom update makeover


farmhouse bedroom update makeover


farmhouse bedroom update makeover


farmhouse bedroom update makeover


farmhouse bedroom update makeover


farmhouse bedroom update makeover


Since I'm cheap I didn't want to splurge on a new curtain rod I decided to reuse the existing one.  It's amazing what a little spraypaint can do.  I don't think anyone would guess that this is a wooden curtain rod.


Crossing one more room off of our home makeover list is a great feeling - I'm hoping I'll be able to add our kitchen to the list by the end of the summer so keep an eye out for that!


Source list:
-Metal bedframe: Craigslist
-Painted dresser: DIY
-Wood Isabelline Plaque: Kirkland's
-Wall clock: Hobby Lobby
-Curtains: IKEA
-Butterfly prints: IKEA
-Frames: Michael's
-Bedspread: Target
-Teal decorative pillows: TJ Maxx
-Blue vase: TJ Maxx
-Greenery: Michael's


Thanks for reading!


DIY: Living Room Gallery Wall How-To

DIY living room gallery wall


In the process of updating our upstairs living room I knew I really wanted to incorporate a gallery wall somewhere in the space.  Reason #1: everyone and their mother seems to have some kind of gallery wall in their house right now and I'm envious, and Reason #2: it would give me an excuse to show off some of my favorite prints and pieces.  I'm sure there are probably a dozen different ways to assemble and hang a gallery wall, but I'm going to walk through the method that worked for me.

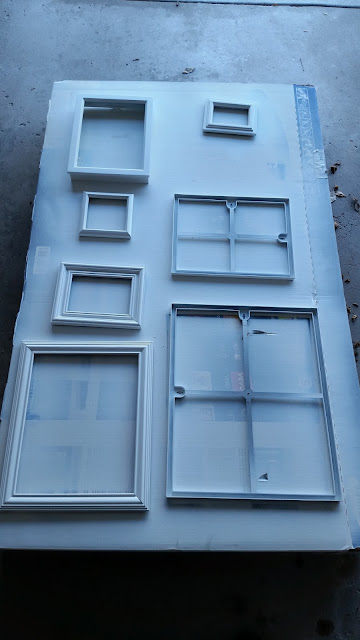
Step 1: Collect pieces for your gallery wall.  This is the fun part!  Gather up any and all wall hangings that you want to have displayed.  If you need frames I'd suggest stopping by your local Goodwill or secondhand store.  Don't worry about the size, color, or width of the frame - having variation is a good thing!  But if you do want your frames to have a more cohesive look, you can do what I did and spraypaint most (or all) of them the same color.  So even though each frame might be a different style, having them all be the same color makes them more visually relatable.
DIY living room gallery wall
Large cardboard boxes work great for spraypainting, BTW.

If you're looking for some ideas of what you can include in your gallery wall frames, here's a few suggestions:

-Pinterest is a great resource to locate free gallery wall images.  I found a few of mine using this site.  For example, the blue feather print can be found here, the arrow print here, the antlers here, and the birds nest here.

-Check Etsy.  Many artists sell digital prints of their art in multiple sizes for reasonable prices.  Once you purchase the PDF you can take it to a copy store and have them print it on some nice heavy paper for you.  You can also find other handmade items on Etsy including drawings, paintings, stitched pieces and other kinds of mixed media designs.

-Use old gift bags/wrapping paper/tissue paper that you have stashed away.  If you're like me and have small scraps of wrapping paper saved up, now's the time to use it!

-Display old cards that you received from friends or loved ones that have a neat design on the front.

-Scrapbook paper comes in tons of colors, textures, and designs that you can use.

-If you're into sewing use some of your fabric scraps.  You can even frame quilt squares or small embroidered pieces.

-Secondhand stores like Goodwill or The Salvation Army can have some pretty neat wall art gems every once and awhile if you look hard enough.  For example, the crocheted butterflies hanging on my gallery wall were from my local Goodwill.  I actually removed them from their original felt backing and placed them on some fresh new fabric that matched my color scheme.

-Sentimental items that you've saved can also look great in a gallery wall.  Things like sheet music, recipe cards, handwritten notes, and family photos are all items you can consider including in your layout.

-Hobby Lobby sells these packs of gallery wall images for super cheap- that's where a few of mine are from.  The pack I bought looks like this:

DIY living room gallery wall


Remember that you don't have to just include framed pieces in your gallery wall - adding in other kinds of artwork like canvases, metal letters, embroidery hoops or other objects adds interest and variation to your assembly.  I managed to find multiple odd items at Michael's that I ended up including in mine, like a burlap-wrapped canvas, a metal key, and some raw wood slices.

Step 2:  Take 4-5 sheets of large sketch paper and tape them to your wall, making sure to overlap and tape them together until they fill up the entire wall space where you want your gallery wall to eventually hang.  This will give you an an idea of how much wall space you will have available for all of your artwork.  As you can see in the picture below cut out a space on the right hand side to allow room for our light switches.  Don't worry about all the outlines shown here - that's taken care of in Step 4.

DIY living room gallery wall


Step 3:  Once you have the area of your gallery wall mapped out, remove the assembled paper from the wall and place it on the floor.  From there you can gather all of your artwork and experiment with the layout of all your separate pieces.  I must have done half a dozen different mock-ups before deciding on the final one!  Make sure to fill your frames with artwork first before you start.  And here's a tip: take a picture of each layout you try.  That way, in case you want to move something back to where it was you'll have a reference of it's original location.

Here are a few tips from an old art major to help you figure out the placement of your artwork:

-Decide on the location of your larger pieces first and make sure they are separated from each other.  In the layout below you can see that both of my larger art-filled frames are on opposite sides of the paper - one is in the top right and one is in the lower left.  Spreading the larger pieces out like this helps anchor the design and keeps it from looking to top-heavy or bottom-heavy.

-Try to identify the main colors in each piece and make sure the ones that have similar color palettes aren't too close together.  Referring back to the two largest framed pieces of art below: both of them also happened to have a mint color scheme going on so I placed them further apart.  This kind of thinking also applies to items that have a similar shape, like square or round pieces.  You don't want to have items that are too similar in color or shape grouped together because it will prevent your eyes from moving easily through your group of images.

-Shake up the orientation of your frames: have some hang vertical and others hang horizontal.

-Keep your spacing fairly even.  I'm not saying you have to get out a ruler and have things perfectly symmetrical, but try and keep the distance between pieces consistent.  There are some areas in my final layout where I have larger gaps and spaces but that was only because I didn't have small enough items to fill those gaps.

DIY living room gallery wall


Step 4:  After you decide on a final layout, take a pen or Sharpie and trace around all of your artwork.  This will help you remember the location of each piece once you hang your paper back up on the wall.

After you've traced each piece you'll now want to go back and mark where all of your nail holes are.  Carefully flip over each item and use a ruler or scrap piece of paper to measure the distance from the top of the frame to the hanger on the back, and then translate that to your paper layout by drawing a dot or "x".  While this process is a little tedious, it makes the hanging part go SO much quicker!

Step 5:  Once all of your nail holes are marked on your paper, remove all of the art and hang your "gallery map" back up on the wall.

DIY living room gallery wall


Step 6:  Hammer in all your nails right through the paper.

DIY living room gallery wall

Step 7:  Double-check that you didn't miss any nail marks.  Once you're sure that all nails have been accounted for, remove the paper from the walls.  Now if you took a picture of your final layout there's no need to keep the paper so you can laugh evilly while ripping it to shreds if you feel so inclined.  But if you forgot to snap a photo then you may want to keep your paper intact so you can use your outlines as a hanging guide.

Step 8:  Hang all of your artwork.  (If that wasn't obvious....)

DIY living room gallery wall


DIY living room gallery wall


Now here's something I didn't figure out until after everything was hung up: if your gallery wall is near a door like mine, you may need to stick some foam tape to the back of your frames to make sure they don't shift.  I soon noticed that every time the door was opened or closed all of my artwork would go askew which drove me crazy.  This foam tape saved the day!  All it took was a few layered squares on the back of each piece and voila...no more shifting.

I still have a few pieces to finish, like the burlap square and raw wood slices.  What to put on them....I just can't decide!


Source List:
-Michael's: Burlap square, wood slabs, and metal key
-"Only Just Whisper" print: Kurt Halsey
-Metal "S": Urban Outfitters
-Heart/Life is Beautiful/Succulent art: Gallery Art booklet from Hobby Lobby
-"Happily Ever After" art: DIY (a closer look can be seen here)
-Crocheted butterflies: Goodwill
-Lace embroidery hoop: DIY
-WI state wood plaque: local art shop
-Feather art
-Antler art
-Arrow art
-Birds nest art


Thanks for reading!

DIY: Rustic Coffee Table and TV Stand Makeover


Hey guys,

Long time no chat!  Sorry for the unplanned hiatus - the end of the year is always a crazy-busy time with Thanksgiving, Christmas, and New Years...so now that the holidays are out of the way I can try to get back on track with blogging.  Though I have to admit there was one more culprit that distracted me from crafting posts: I finally discovered Instagram.  Seriously I had no idea what I was missing!  For a slacker like me, Instagram is a lazy-girls dream.  Instead of spending hours writing up explanations and laying out posts, I could now post photos with small descriptions in a matter of minutes.  Super awesome, but also super distracting.  Whoops.  While Instagram is a great tool to share my projects and DIY's with a different audience, I still like having detailed records of what we've been up to, which is why I'm trying to switch gears and get back into the blogging world.

Soooo back to the house!

In one of my last posts I shared our upstairs living room makeover.  One of the many changes we made to this room was repainting our coffee table and TV stand.  These two pieces of furniture had definitely seen better days - I bought them from a couple off Craigslist about five years ago and they're made mostly of particle board so they were definitely in need of some TLC.


coffee table makeover


TV stand makeover


I took both pieces out to the garage and primed them with Gripper water-based primer followed by two coats of Behr paint.  I didn't paint the tops of either piece because we had decided to attach some wood boards to the top instead for some visual interest.

After picking up our boards at Menard's we cut them to the needed length for both tables.  Then I got to staining!  I decided to try the vinegar steel wool method since many people on Pinterest were able to achieve a nice weathered gray look with it.  After experimenting with a few different mixtures (one with coffee grounds, another with black tea) I settled on the black tea concoction since the test board had the color I was looking for.  I set to work painting each board with the vinegar/steel wool/tea combo using a foam brush.


While the color looked perfect during the initial application, I was disappointed to discover that once the stain dried it turned an orangey color.  I thought maybe if I tried another layer of stain it would help, but just like the first layer it eventually turned orange as well.  Such a bummer!  Since I didn't want to hold this project up I decided to continue on with attaching them to the tables, but I'm hoping at some point to play around with re-staining them a darker color to get rid of this 90's-looking hue.

After the boards were completely dry we started attaching them to the tables board-by-board using wood glue.

rustic farmhouse coffee table makeover DIY


To make sure that the boards wouldn't pop up or shift while drying we used these small clamps to keep them in place.  Worked like a charm!  Before long our table tops looked like this:

rustic farmhouse coffee table makeover DIY

The inconsistencies in color were my favorite part, but other than that I doubt I'll be using the vinegar-steel wool method in the future.

After a bit of distressing and some new hardware our TV stand and coffee table looked like this:

rustic farmhouse TV stand makeover DIY


rustic farmhouse coffee table makeover DIY


Even though I'm not super happy about the color of the wood tops, I really do love the overall look of this transformation and am crossing my fingers that both pieces hold up for a few more years until we can afford something of higher quality.  For now, we can check these off the list!

Thanks for reading!

Rustic Christmas Decor Ideas

Snow is finally falling here in Wisconsin, which means it's time for the fall decor to come down and the Christmas stuff to go up!  I was able to find a lot of great things for our place this year, which is a good thing considering we didn't have much to start with.  (We moved into our house in September of 2014 and barely had a budget for holiday decor last year!)

My favorite thing to decorate for Christmas has to be the tree.  Kevin and I are both huge fans of having a real tree, and this year I went for a more rustic theme using things like burlap, small chalkboards, rusty sleigh bells and metal tags.

rustic christmas tree decorations


rustic christmas tree decorations


I don't know about you, but it's feeling pretty festive up in here.

rustic holiday Christmas home decor ideas


I found some super cute wood deer figurines at Michael's and placed some silver ornaments inside a cloche that I also bought there earlier this year.

rustic Christmas holiday decorations


I'm a huge fan of Lucy at Ms. Craftberry Bush's printables.  She makes the most beautiful watercolor designs - definitely check out her work if you haven't already!

rustic Christmas holiday decorations


This pillow was one of my first purchases from Decor Steals.  They have some of the best rustic and vintage-looking pieces.

rustic Christmas holiday decorations


Our mantel got a big 'winter wonderland' makeover as well.

rustic Christmas holiday fireplace mantel decorations


I also updated our chalkboard to something that fit the season....

rustic Christmas holiday chalkboard decorations


....and decked out the area above our kitchen cabinets with lots of Target hot spot finds.

rustic Christmas holiday decorations


I also made sure to give the outside of our house a little holiday lovin'.  I hung this wreath from HomeGoods on our front door.  I love the mix of burlap, pinecones, and rusty tin stars!

rustic Christmas holiday decorations


Next to the front door sits our antique window flower box which I filled with scraps from our Christmas tree.  To add some interest I stuck in some red berry branches from Hobby Lobby and a lantern from Kohl's.

rustic Christmas holiday decorations


Last but not least, we can't forget our Grinch lawn ornament.  Kevin and I made him last year and he's one of my favorite DIY projects to date.  He's definitely a show-stopper and one of the most fun Christmas decorations on our block.  (if you'd like to see how we made our Grinch, check out this post.)

Christmas holiday decorations Grinch lawn ornament DIY


I hope you all have a safe and happy holiday season with your friends and families.

Merry Christmas, and thanks for reading!


Source List:

Living Room
-Chalkboard Christmas tree ornaments and burlap ribbon: Michael's
-Rusty sleigh bell ornaments: JoAnn Fabrics
-Twine tree star: Michael's
-Tree skirt: Menard's
-Wood deer figurines and glass cloche: Michael's
-Birch tree & red berry garland: Stein's Garden and Gifts
-'North Pole Toy Co.' pillow: Decor Steals

Fireplace Mantel
-Burlap 'joyful' letters: DIY
-Wood candle holders: Target
-Snowy trees and star garland: HomeGoods
-Burlap glitter trees: Michael's
-Green garland: Hobby Lobby
-White sweater stockings: JoAnn Fabrics

Kitchen
-Burlap and green trees, small wood crate, wood candle holders: Target
-Snowy twig balls: Hobby Lobby

Outside
-Wreath: HomeGoods
-Antique window flowerbox: local thrift store
-Lantern: Kohl's

A Tour of Our Home: Upstairs Living Room Rustic Revamp (Before & After)


Hey all - I'm so excited to FINALLY share our revamped living room!  This space has been in the works for almost a year and has been updated bit by bit, piece by piece.  There's still some things to be done, but I feel like it's finally at a point where it's worth sharing.

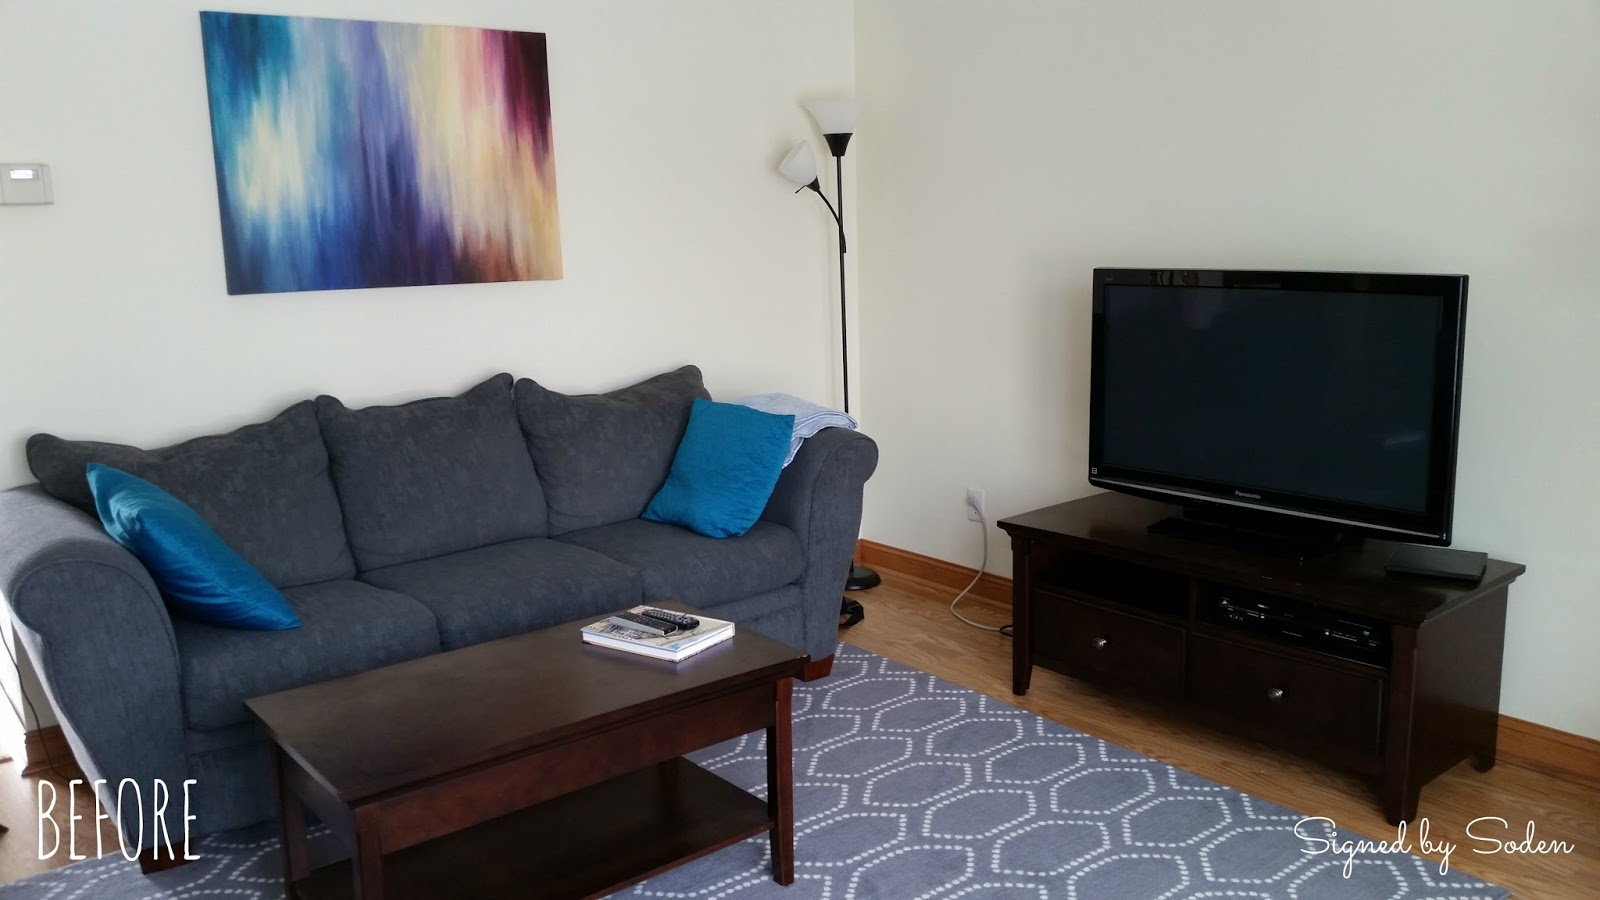
Here's what our upstairs front living room looked like shortly after we moved in:


rustic farmhouse before and after living room makeover


Everything in this space was purchased for my old apartments - the only exception being the rug which we bought from Target shortly after moving in to the house.  The sofas, coffee table, and end table were all bought off of Craigslist over five years ago.  The painting on the wall is an original of mine that was made for my old apartment and the pillows were bought to match.  Kevin's only contributions were his sad standing lamp and TV.


rustic farmhouse before and after living room makeover


rustic farmhouse before and after living room makeover


rustic farmhouse before and after living room makeover


Here you can see the opposite side of the room.  To the left is the front door (not shown) and in the top left is the door to the garage.  The stairs leading down take you to our lower level living room and the guest bedroom (as well as the "Man Room" and laundry room which are a level below) and upstairs are the three main bedrooms.  On the right side of the photo you can see a section of our dining room, and around the corner is the kitchen.

rustic farmhouse before and after living room makeover


Now that you know what we started with I can show you where we've ended up almost 12 months later:

rustic farmhouse before and after living room makeover


Gone are the yellow walls, dark furniture, bright pillows, and bare walls.  I wanted to give the room a warmer and more rustic feel so we added some more wood elements along with some worn-looking pieces.


rustic farmhouse before and after living room makeover


rustic farmhouse before and after living room makeover


The picture below makes the walls look a little pink-ish, but I promise they're more of a tan/grey in person.

rustic farmhouse before and after living room makeover


rustic farmhouse before and after living room makeover


What immediately drew us to this house was the open concept of this level and the amount of natural light that the room received.  Even on a cloudy day we rarely have to turn the lights on.

Normally you'd expect the first change in the room to be the paint color, but since we were waiting on help from family for that project we decided to skip ahead and make one small change first.  At this point it was right after tax season and we had just received our refund (woohoo!).  Being the responsible adults that we are, most of it went toward debt.  But the tiny amount we got from back from the State could be spent on the house, and what did I choose to replace?  The massive eye-sore of a light fixture hanging from the ceiling in the dining room.  Seriously this thing was massive- the picture doesn't do it justice.  One big bug-catching machine.


I shopped around online and was hard-pressed to find ANYTHING that fit the style I was going for that was under $300.  Eventually we decided to just try shopping around town and ended up finding this beauty at BBC Lighting in downtown Milwaukee for $240.  *Insert angels singing*


About a month after the chandelier was installed we painted.  Annndddd just like every other time I paint a room it took me weeks of debating to figure out what color I wanted to go with.  I knew I wanted to go with the greige route to keep things neutral and eventually narrowed it down to Behr's "Chocolate Froth" or "Wheat Bread":


I ended up buying samples of both colors and painted little swatches of them on various walls in the room to see how each looked at different times of the day.  I highly recommend doing this - it makes the decision process sooo much easier.  After much debate the lighter tone "Chocolate Froth" won out.


I knew going into this revamp that I wanted to give my old coffee table and TV stand a new lease on life.  Both pieces aren't the highest quality and were pretty beat up, but I knew that with new tops, paint, and hardware they could be the center of attention.  And look at them now!  They look like completely new pieces.


With the help of our new miter saw cutting the boards for the tops was a snap, and I actually stained them using the vinegar/steel wool method which had decent results.  I'm not super happy with the orangey tint of the wood so they may get touched up eventually.

After the furniture was given a face lift it was time to add decor and accessories.  I brought out the terrarium we used as a card box from our wedding to sit on our side table and found these window picture frames at World Market to hang on either side of our TV.


Since our TV stand is fairly low to the ground we needed something to help fill the wall space above the TV screen.  That's where our DIY floating shelf came in.

rustic farmhouse before and after living room makeover

The cloche, pumpkins, and cottom stem all came from Michael's.  The bird cage photo holder is from TJ Maxx and the small silver vase is from Target.  The white candle holder is from JoAnn Fabrics.

I had attempted to re-paint my large canvas with a color scheme that would better fit the new theme of the room but something still wasn't working.  That's when I decided to switch gears and had Kevin make this barn door wall hanging inspired by Johanna Gains from HGTV's Fixer Upper.  I'm addicted to the show/blog and love how she uses old shutters and doors as wall hangings in the homes she decorates.  To finish it off I hung a coffee filter wreath I made on top, though I'm probably going to end up changing this since the wreath is a little big in proportion to the barn door.

rustic farmhouse before and after living room makeover


rustic farmhouse before and after living room makeover


Hanging on another wall is the thumbprint tree guest book from our wedding (the original post for that project can be found here).  I love walking past this every day and seeing the names of so many people who where there on our big day to celebrate with us.

rustic farmhouse before and after living room makeover


I also incorporated a gallery wall in the room to add some visual interest since all of the other walls in the room are decorated with larger pieces.


rustic farmhouse before and after living room makeover


Source List:
-Paint Color: Behr "Chocolate Froth"
-Floating Shelf: DIY
-Window frames: World Market
-Barn door wall hanging: DIY
-Coffee filter wreath: DIY
-Floor Lamp: Walmart
-Chandelier: BBC Lighting
-Gray rug: Target
-Coffee table and TV stand: originally from Target, bought on Craigslist
-Key pillows: TJ Maxx

There are still a few changes I'd like to make to this room like adding window treatments, re-staining the chest by the window, and painting the trim white....but I'm sure those things will come with time.  What do you guys think?!  Let me know in the comments :)  Thanks for reading along!